

Most operators have a network preference list on their SIMs to prioritize specific networks over others available.
There could be multiple reasons why this list is populated but it is at the operator’s discretion.
All Onomondo SIMs do not have a preference list by default, allowing the device to choose the most suitable network automatically.
We do this because setting PLMN preferences will reduce the overall quality of connectivity, as a device will often connect to a networks with inferior signal strength because they are higher on the preference list.
Weak signal leads to higher packet loss, which increases packet being re-transmitted resulting in:
- Increase in data usage.
- May affect the ability to establish a connection to a server (such as TLS).
- Increased transmit power and overall higher power consumption.
You can learn more about the advantages of non-steered IoT SIMs in this article: Improve coverage with automatic network selection.
That said, you may still want to add a network preference list to your SIMs. Here’s how to do that with AT commands.
Table of Contents
What kind of preference lists can I update?
This SIM card has different preference lists including:
- EFPLMNwAcT (User controlled PLMN selector with Access Technology)
User defined list, which can be updated using AT commands on the device. - OPLMNwAcT (Operator controlled PLMN selector with Access Technology)
Operator defined list and only can be updated by the Operator. In this case, an Over The Air (OTA) update by Onomondo.
Each of these lists includes the possibility to set specific technologies as well. There are other lists that are mostly redundant and don’t include technology (i.e. PLMNsel).
Before starting, you will need to make sure the device is set to the correct Preference list (User defined vs Operator defined). You can check which using AT+CPLS? command. The response from the modem should be CPLS: 0 (the user defined preference list) and is often the default mode.
If not, you can set it to user defined using AT+CPLS=0 command. For more information on the command, please check your module’s AT Command manual.
How can I add a PLMN list to my device?
Once the device is set to the correct preference list you can edit the preference list. In both cases the file is written to the SIM and will persist between power cycles and when the SIM is moved between devices. With that in mind, updates of the PLMN lists should only be done when necessary.
There are two ways to set a preference list on a device, depending on complexity and the size of the list.
Make sure:
- It is only executed when needed – It does need to be updated everything the device tries to connect.
- There is an easy way to update the list on the device – as over time preferences may change.
1. AT+CPOL (the simple way)
The command AT+CPOL allows you add one network at a time to the preference list. You can start by checking if the list is empty using AT+CPOL? command. It should like like:
> AT+CPOL?
+CPOL: 1,2,"23801",0,0,0,1
+CPOL: 2,2,"23820",0,0,0,1
+CPOL: 3,2,"23802",0,0,0,1
+CPOL: 4,2,"23866",0,0,0,1
+CPOL: 5,2,"23801",0,0,1,0
+CPOL: 6,2,"23820",0,0,1,0
+CPOL: 7,2,"23802",0,0,1,0
+CPOL: 8,2,"23866",0,0,1,0
+CPOL: 9,2,"23801",1,0,0,0
+CPOL: 10,2,"23820",1,0,0,0
+CPOL: 11,2,"23802",1,0,0,0
+CPOL: 12,2,"23866",1,0,0,0
...
For each network you want to prioritize you use the AT+CPOL command. For example if you want to prioritize TDC (23801), followed by Telia (23820) would look like this
> AT+CPOL=1,2,"23801",1,1,1,1

+CPOL: 1,2,"23801",1,1,1,1

> AT+CPOL=2,2,"23820",1,1,1,1

+CPOL: 2,2,"23801",1,1,1,1
You can also combine them into one line using the separator “;” and the aggregator “+“
AT+CPOL=1,2,"23801",1,1,1,1;+AT+CPOL=2,2,"23820",1,1,1,1

+CPOL: 1,2,"23801",1,1,1,1
+CPOL: 2,2,"23820",1,1,1,1
The values in the AT+CPOL command
Here is a list of the defined values of the AT+CPOL command.
AT+CPOL=<list_index> ,<network_format> ,<network> ,<GSM_AcT> ,<GSM_Compact_AcT> ,<UTRAN_AcT> ,<E-UTRAN_AcT>
- list_index – number on the list you are setting. If you already have set that index you will be overwriting the existing entry
- network_format & network – We recommend using 2 as this sets the format to numeric, allowing you to use the mccmnc code. (compared to 0, which is the string name as defined by the device)
- GSM_AcT – equivalent to 2G
- GSM_Compact_AcT – equivalent to 2G + EDGE
- UTRAN_AcT -equivalent to 3G
- E-UTRAN_AcT – equivalent to 4G
Once you have set your list you will need to reboot your modem or put it in and out of flight mode. You can check if it was successful by using AT+CPOL? you should get a new response.
> AT+CPOL?

+CPOL: 1,0,"TDC",1,1,1,1
+CPOL: 2,0,"Telia DK",1,1,1,1
With the EFPLMNwAcT you can prioritise network technologies as well. If we look at the following content we see that ‘23801’ (TDC) is prioritised over ‘23820’ (Telia), but if Telia is available on LTE and and TDC isn’t, Telia will have the priority.
+CPOL: 1,2,"23801",0,0,0,1

+CPOL: 2,2,"23820",0,0,0,1

... ...

+CPOL: 5,2,"23801",0,0,1,0

+CPOL: 6,2,"23820",0,0,1,0
This can be useful where you want to minimise the use of 2G in battery powered devices.
2. AT+CSIM (the more complex way)
The AT+CSIM command is used to select specific folders on the SIM. There for you have to select the correct folders to get the correct preference list to update it using the encoded bit information.
For example, If you want to set an empty list, it would like this:
> AT+CSIM=14,"00a4000c027fff"

+CSIM: 4,"9000"

> AT+CSIM=14,"00a4000c026f60"

+CSIM: 4,"9000"

> AT+CSIM=510,"00d60000faffffff0000

+CSIM: 4,"9000"
The two first commands are related to selecting the correct file. The third command is setting the preference list.
To break it down there are 2 parts of the list:
- The list prefix.
- Each indexed network of the list split into network code and technology preference.
1. The List Prefix
The first 10 characters are the apdu command for updating the binary file previously selected – 00d60000fa. CLA:00 INS:6d (update) P1:00 (Select DF, EF or MF by file id) P2:00 (Offset low) LC:fa (length 250)
2. Indexed network item
After that you can begin by declaring each network. An empty item in the list will look like ffffff0000.
Even though the list could be bigger, the remaining indexes will be cleared once the first ffffff0000 is defined. This is to avoid repetition/redundant code.
Network Code
The first 6 characters are the mccmnc of the specific network (in this case, ffffff) and is split into 3 positions for the mcc and 3 positions for the mcn. When a position is empty, it is defined by an f.
As part of the standards, each pair of values in the network is reversed. For example, 23801 would look like:
23801 = mcc=238 + mnc=_01 = 238f01 = 32f810
Technology Preference
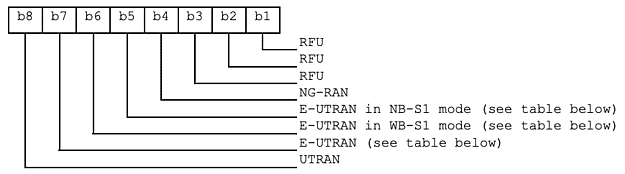
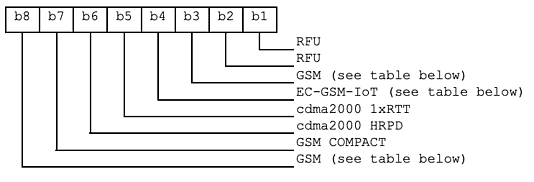
The next 4 digits (2 bytes) (in this case, 0x0000) represents the technology and are encoded according to TS.131.102 section 4.2.5. In general the first byte encodes the 3G, LTE and 5G network technologies and the second byte encodes different GSM access technologies.
For the first byte the following tables applies:

And similar tables for the second byte:

Thus, to enable LTE Cat-M1 (and ‘regular’ LTE) (E-UTRAN in WB-S1 mode) we would have to set the correct bits, i.e. 0b01100000 (0x60). Similar for 3G we have 0x80, and all LTE types 0x78 and finally 0x08 for 5G (NG-RAN “Next Generation RAN“).
To enable multiple technologies apply a logical bitwise OR between the technologies i.e. 3G+LTE Cat-M1 we get 0x60|0x80=e0 (0b11100000).
Some common configurations are listed below:
- LTE-M and general LTE: 6000
- GSM only: 00fc
- 3G only: 8000
- LTE + 5G: 7800
- LTE-M and GSM: 60fc
- LTE and GSM: 70fc L
- TE and 3G: f000
- Everything (2G/3G/LTE/5G): f8fc
Using the CPOL example the code would like:
> AT+CSIM=14,"00a4000c027fff"
> AT+CSIM=14,"00a4000c026f60"
> AT+CSIM=510,"00d60000fa32f810e00032f8020e00ffffff0000"
- The first indexed network – 23801 (32F810e000).
- Next, the second indexed network – 23820 (32F802e000).
- Finally, ffffff0000 – declaring the rest of the list as empty.
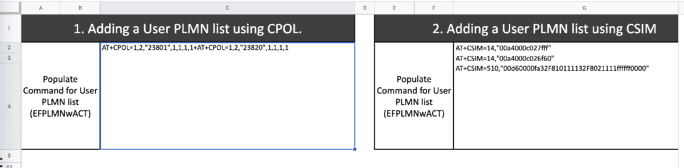
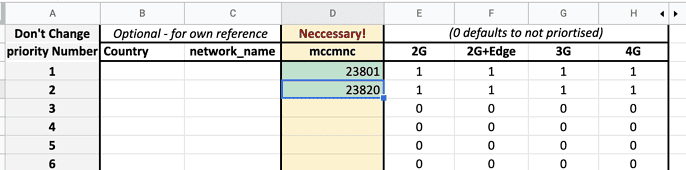
Google Sheets PLMN list creator template
We have created a Google Sheets PLMN list creator template that you can use to generate either set of codes by adding the mccmnc.
Follow these steps to use the sheet:
1. Save the template to your Google Drive

2. Add the list of priortised mccmncs
3. Copy the commands you want to use