


In this guide, we show how to redirect and respond to packets for devices that can not be modified.
For the sake of this article, and to keep it simple, let’s imagine we have an old device that for some inexplicable reason sends a UDP packet to 1.2.3.4:5432 with a payload and expects to get the same payload returned.
We no longer have access to the server on 1.2.3.4 and we also cannot update the device because it was developed by someone else.
There are several ways to solve this problem with Onomondo, but in this course, we will use an HTTPS Connector to intercept the UDP packet, and the Messages API to send a UDP packet to the device.
The code in this course is available on github and can deployed directly to Heroku.

Contents:
- Use Traffic Monitor to capture traffic
- Set up basic service
- Create an HTTPS Connector
- Have your SIM use your HTTPS Connector
- Test that there’s access from your device to your service
- Create an API key
- Modify your basic service to send responses back to your device
1. Use Traffic Monitor to capture traffic
A good place to start when you have an old device is to capture the traffic and see what it’s doing. That way we can learn what happens and see if we can’t somehow make it work.
To do that, we use Onomondo’s Traffic Monitor so that we can capture all the traffic going in and out of the device. The device does not need to have anything installed as all traffic is captured at the network level.
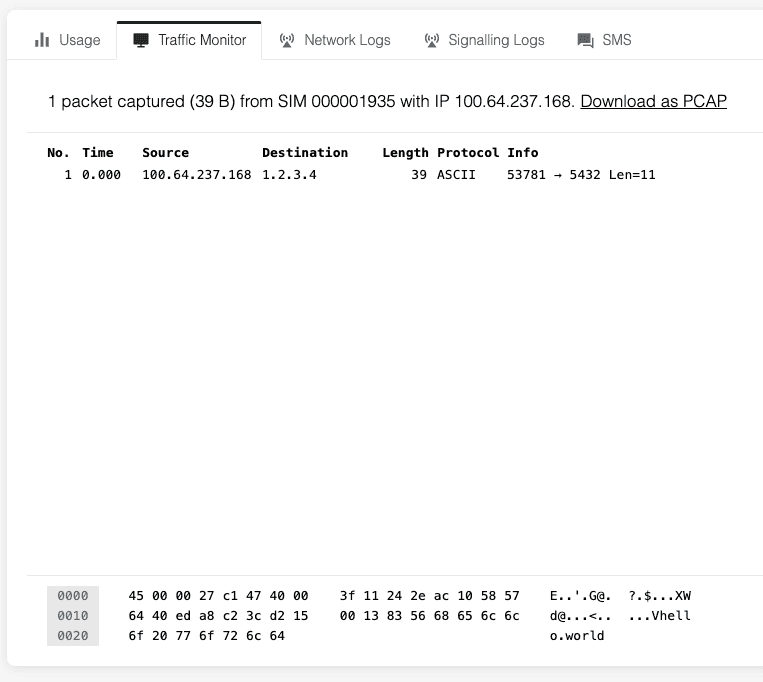
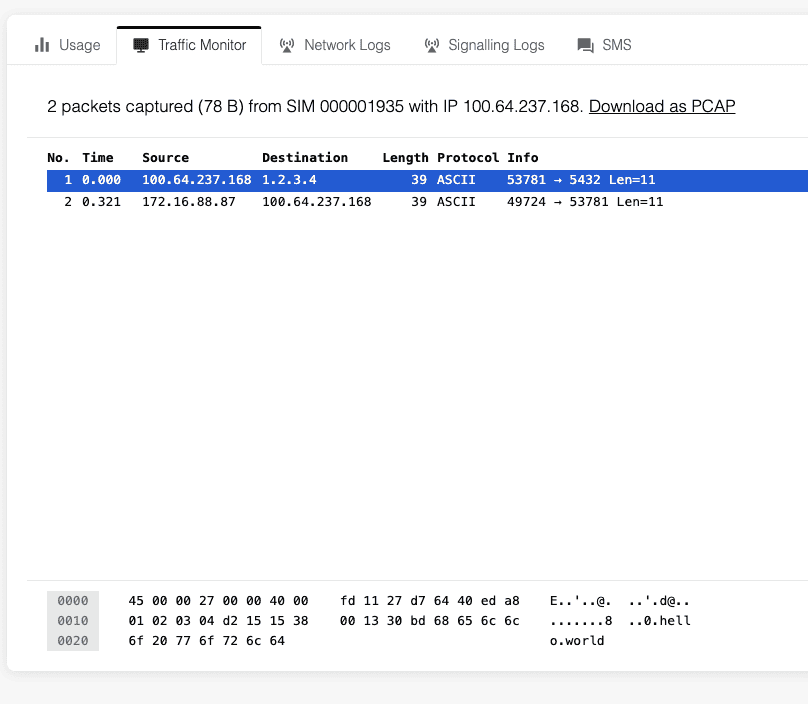
In this example we see that the device sends one UDP packet to 1.2.3.4:5432 with the payload hello world.
2. Set up basic service
To programmatically intercept and respond to the UDP packet, we have to set up an HTTPS Connector. To do that we have to set up a service that responds to HTTPS calls.
You can host your server anywhere, but for this example we will be using Heroku. Please note, it’s a requirement that it’s available through HTTPS and not HTTP.
const express = require('express')

const app = express()

app.post('/', express.json(), async (req, res) => {
   console.log(req.body)
   res.end()
})

app.listen(process.env.PORT || 3030)
Deploy this very basic server. This is just to see that everything works.
You should have a URL to your server. It could look like https://example-https-connector.herokuapp.com/.
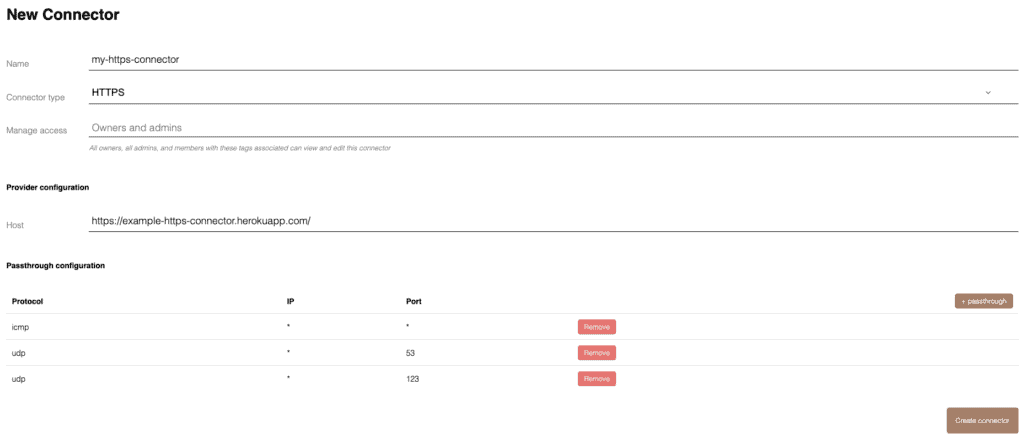
3. Create an HTTPS Connector
Now we need to make sure that Onomondo will pass data packets that go out of your device on to your service. This is done by creating a connector.
The important part is to insert the URL to your server.
The passthrough rules are to make sure that some data packets are not passed on to your service. Instead they will be routed directly to the Internet. Passthrough rules are explained more in this help article. For this example, I’ve chosen to pass ICMP, DNS, and NTP to the Internet – this is just to make sure it doesn’t interfere with our code.
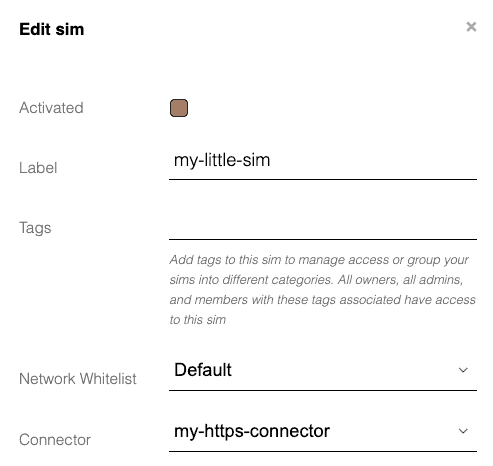
4. Have your SIM use your HTTPS Connector
Find your SIM in Onomondo and edit it, so that it uses your newly created connector.
5. Test access from your device to your service
We’ve now set up the service, created the HTTPS Connector, and updated the SIM. Now it’s time to turn on the device.
If everything works, you should be able to see data coming in to the logs on your service (nothing else will happen for now).
If no data is coming it, it’s good to use the Traffic Monitor to inspect the traffic coming out of the device. Often data isn’t coming out, or it hits the passthrough rules so it goes directly to the Internet.
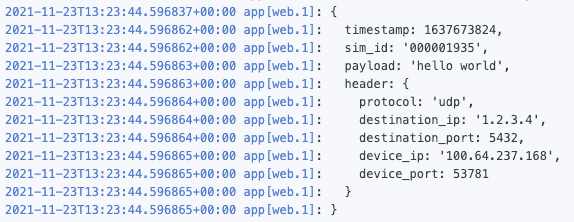
In this example, my device sends the payload hello world to 1.2.3.4:5432 and the output looks like this:
6. Create an API key
Traffic is now flowing out of the device, and back to your service. Now we want to send data back to the device. To do this, we have to create an API key.
Give it any name you want. For this example, we don’t restrict access for the key, but for a more production-ready setup, it would be good to do so.
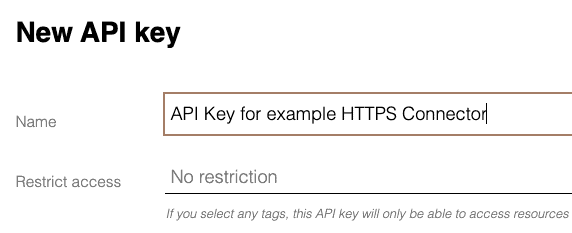
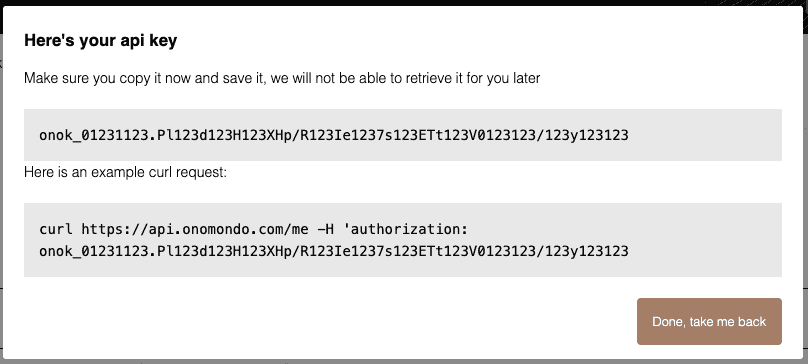
Remember to save the key after you’ve created it!
If you forget it, just delete the API key and create another one.
You need to use the API key in your service. On Heroku, they call them Config Vars but it’s basically an environment variable.
7. Modify your basic service to send responses back to your device
All the parts we need are there, so now we just need to combine them. The code is available on github.
In the code, you will see that we use the Messages endpoint in the API. What this does is make you able to send UDP or TCP payloads directly to a device.
From the device’s point of view, it will send a UDP packet to 1.2.3.4:5432 and from a random port (normally determined by the OS) and it will receive the response as a UDP packet sent to the same port, with the same payload.
const express = require('express')
const axios = require('axios')

const API_KEY = process.env.API_KEY

const app = express()

axios.defaults.baseURL = 'https://api.onomondo.com'
axios.defaults.headers.common['authorization'] = API_KEY

app.post('/', express.json(), async (req, res) => {
   const {
      timestamp,
      sim_id: simId,
      payload,
      header
   } = req.body

   const {
      protocol,
      destination_ip: destinationIp,
      destination_port: destinationPort,
      device_ip: deviceIp,
      device_port: devicePort
   } = header

   console.log(`${timestamp} - ${simId} - ${protocol} - ${deviceIp}:${devicePort} - ${destinationIp}:${destinationPort}`)

   if (protocol !== 'udp') returnres.end()

   await axios.post(`/messages/${simId}`, {
      protocol: 'udp',
      port: devicePort,
      data: Buffer.from(payload).toString('base64') //
      Echo back as a base64 encoded string
   })

   res.end()
})

app.listen(process.env.PORT || 3030)
You can also deploy directly to Heroku if you want to try it out.
Run it all
We turn on our device again, and now we go to Traffic Monitor to see what it looks like from the device’s point-of-view.
As you can see, it has sent one packet, and received another. If you notice the code in the bottom right, you can see that it says hello world which was the payload we sent.
Summary
In this course, we tried to work with a device that we do not change in any way. And even though it is trying to contact a server we no longer have access to, we can still use an HTTPS Connector to intercept the packets that it sends.
By using the Messages API we are also able to send packets directly back to the device.